Using rust proofing paint during car restoration or repair

Using rust proofing paint during car restoration or repair


Welcome to the third instalment in our four-part series on the main corrosion-beating steps to take during vehicle repair or restoration. We started by looking at rust removal, followed by rust conversion. Now we move on to painting with rust proofing paint, then in part four we look at rust proofing with wax.

Assuming you have completed the rust removal and rust conversion process, you now have a sound and stable surface ready for painting. But painting could still be a few steps away. As with any painting project, surface preparation in vehicle restoration or repair is just as important as the painting itself.


Degreasing and salt removal

First, it is essential to thoroughly clean and degrease the surface before painting. Grease, oil and other contaminants need to be removed in order to ensure the best possible adhesion of paint to metal. This in turn improves the performance of the paint in protecting your vehicle in the coming years.

A good example of the type of product that is suitable for this task is Rustbuster’s non-toxic Safer Degreaser. This is available in direct-to-surface and concentrated formulas. Leave it on the surface for up to an hour and then rinse with water.

Next, to complete the surface preparation, it is wise to remove any traces of salt. Salt can have a devastating effect on metal, accelerating corrosion. Trapping salt crystals between the surface and the paint you are about to apply is a ticking time bomb, almost certainly leading to blistering somewhere down the line. It can also inhibit the paint’s ability to properly adhere to the surface.

Rustbuster’s Chlor-X Salt Remover is available in three formulations:

  • Chlor-X DTS (direct to surface). The is a ready-to-use formula. Spray it onto the surface, agitate with a brush, leave for ten minutes and rinse off. It’s ideal for working on localised areas of metal during repair or restoration.
  • Chlor-X 201. A concentrated formula, usually connected to a hose and mixed in a ratio up to 30-to-1. Ideal for working on larger areas or removing salt from across the vehicle underbody.
  • Chlor-X 100. This is 100% concentrated Chlor-X for use in power wash steam cleaners (mix with water to a ratio of 100-to-1) or hydro blast cleaners (mix to 500-to-1).

It is possible to combine degreasing and salt removal, if for example you are using a steam cleaner that has a dowser via which you can add both products into the water stream.

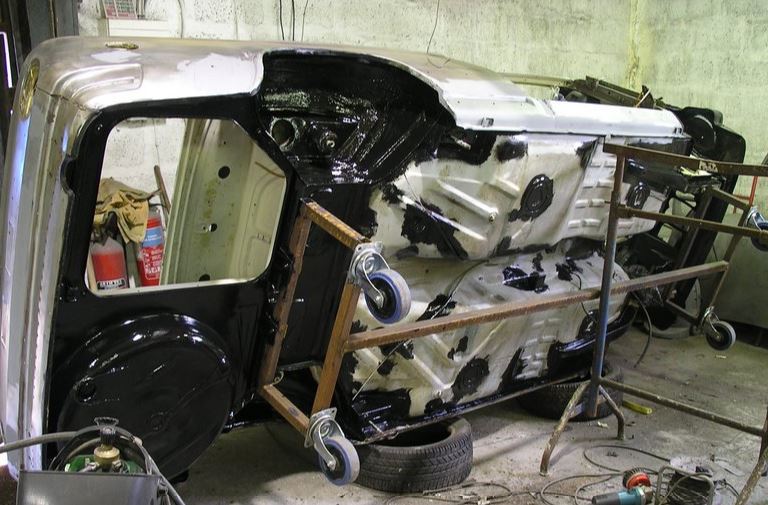
Using rust proofing paint: chassis and underbody

The traditional approach with painting is in two stages: start with a primer/undercoat and then apply the top coat. But when painting a vehicle’s underbody, wheel arches and so on, a much simpler alternative is to go for an all-in-one primer/finisher.

Rustbuster’s EM 121 Rust Proofing Paint is ideal for applying direct to a prepared metal surface. It’s supplied as a two-part kit, with parts A and B simply mixed in a one-to-one ratio with a little thinner, and then applied by brush or spray equipment. Ideally apply a second coat within seven days for maximum protection.

Check out our video on mixing EM 121 for great tips on mixing parts A and B with thinner in the right way. Only mix as much as you will need for the next 60-90 minutes, as after this time the paint will start to harden.

One of the great things about EM 121 is that it can be applied with a brush, which is ideal if you don’t have spray equipment or are painting relatively small areas at a time. Once properly mixed, EM 121 is easy to apply with a brush.

Brush application can in fact be used prior to spray painting in tricky areas. It’s an approach known as stripe coating – take a look at our video on stripe coating EM 121 for some good tips on this approach. If you are spraying, we recommend taking a look at our video on spraying EM 121 for advice on setting up and using the spray equipment.

Painting: body panels

For body panels, you are almost certainly going to still use a primer before applying the top coat in order to achieve a factory-like finish. The problem with traditional primers is that they are porous and will, over time, let moisture in. This can in turn lead to corrosion.

Professional paint shops don’t need to worry about this problem. They typically operate in a moisture-controlled environment, and they tend to apply the top coat very soon after the primer. These two factors mean that they can use traditional primers.

However, if you are a DIY-er working in your garage or home workshop, it’s likely that the atmosphere will be fairly humid. Also, there may be a considerable time gap between applying the primer and top coat. This why use of a non-porous primer is recommended.

Rustbuster’s 421 Epoxy Primer offers protection against moisture, even if there is a considerable delay before applying the top coat. It also offers high-build performance and can be followed by an epoxy, single pack cellulose, or two pack top coat after a light sanding with a P320 abrasive.

Where filling of body panels is necessary, you of course have several products to choose from and you may already have your favourite. If speed and simplicity is what you’re after, the good news is that you don’t need to use traditional two-part fillers, with the time and need for accuracy in mixing that they involve. Rustbuster offers the excellent Autofill Gold two-part body filler, that also has the advantage of being ready to sand in as little as 20 minutes.

With filling, it really is a case of practice makes perfect. Good technique can be developed, so get on YouTube and watch some experts show you how it’s done if you’re unsure of the techniques involved.

Please contact us for further information or advice

We hope this article will help you achieve a better finish with your rustproofing paint. Please get in touch with any questions, and look out for the fourth and final part in this series, where we’ll cover the use of rustproofing wax.

Share this post

Recent Posts