
Rust removal options for car restoration and maintenance
Most car restoration projects will involve some rust removal prior to surface preparation and painting. There are several techniques to choose from, but which will be suitable for your project? In this article, we look at your options.
This is the first in a series of blogs on the four main steps that typically feature in restoration projects: rust removal, rust conversion, using rust proofing paint and rust proofing with wax.
Cut out the rot
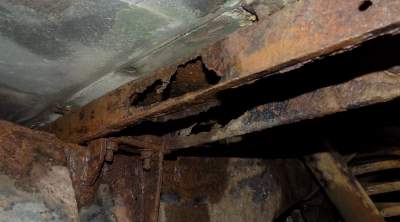
Obviously any seriously rotten or weak metal needs to be cut out and repaired, with new material welded into place. So, the first task is to identify where that’s needed. It’s time for a sharp intake of breath as you remove paint or underbody seal from any areas where you suspect that the brown stuff may be hiding underneath.
Once paint has been removed where necessary and you have proper access to metal, a useful tool is an MOT corrosion hammer. One can be bought for under twenty quid and is well worth the small investment. This tool will give you an indication of where the metal has corroded to a point where welding is needed. Put simply, when the hammer makes a hole, there is a needed for new metal!
Just how hard MOT testers can tap with their corrosion hammers is a bit controversial. But it’s not an issue for the DIY restorer: tap until you are satisfied that you have identified any areas that need attention. You may want to be more rigorous than the MOT standard as this is the start of a serious investment in your vehicle, so why risk cutting corners?
Dealing with surface rust
As well as areas of serious rot, vehicles often exhibit areas of basically sound metal showing signs of surface rust. The task here is to remove any loose, flaky rust. You can either get down to completely rust-free metal, or metal with visible but solid corrosion that can be treated with rust converter (which we’ll look at in our next blog in this series).
The two main methods for the removal of loose surface rust are mechanical and chemical…
Mechanical rust removal
For most DIY restorers, mechanical rust removal will involve the use of one or more of these:
- Scotchbrite pads.
- Sandpaper.
- Wooden-handled wire brushes.
- Wire wheels that attach to a drill or angle grinder.
- A specialist tool such as the MBX.
Sometimes you’ll see us refer to the Surface Cleaning Standards. For example, ST2 is the standard for thorough cleaning with hand tools. The surface may still show signs of corrosion after cleaning to this standard BUT there will be no loose rust and there should be a faint metallic sheen. ST3 is more thorough cleaning done using power tools, after which there will be a more pronounced metallic sheen.
Which standard you aim for largely comes down to the quality of paint finish you are seeking. Getting to an ‘ST3’ standard will likely result in a better paint finish than an ‘ST2’ standard. It’s common sense really: we all know that the better the preparation, the better the finish.
Another option is media blasting (sandblasting) with media such as silicon carbide, aluminium oxide, ground walnut shells, glass beads and steel shot. For most non-professionals, media blasting is unlikely to be an option. It needs to be done with great care as otherwise serious damage can be done to your vehicle. We would suggest you seek professional advice if you are considering media blasting.
The Surface Cleaning Standards for media blasting are SA1, SA2, SA2.5 and SA3: the higher the number, the more thorough the cleaning and rust removal, through to pure clean metal with SA3.
Chemical rust removal
Even after the most thorough mechanical rust removal, a chemical treatment may be needed to tackle minute traces of rust that can remain in the metal. Chemical treatments may also be used as a standalone alternative to mechanical removal.
Chemical rust removers are available in various formulas, so which is likely to be right for you?
You may wish to start with Rustbuster’s Eco Cleaner. This works slower than cleaners with a greater acid content, but it is especially safe and easy to work with. It has a gel consistency and is brushed onto the steel, with more added as necessary so that it doesn’t dry out. Removal of rust typically takes 4-24 hours, and the gel is then rinsed away.
Products with much greater acid content require more care during application but can give quicker results. Rustbuster’s Phos-Kleen A Rust Remover is designed for commercial use, although it can be used by the DIY enthusiast as long as our strict safety standards are followed. But beware: this product works fast, and metal treated with it should not be left unattended. Once the desired level of rust removal has been achieved, the metal should ideally be neutralised with Chlor-X DTS.
To stress how powerful Phos-Kleen A really is, please think of it as a ‘metal remover’. It doesn’t differentiate between rusty and good metal BUT it will remove rust first, as it starts from the surface down. If left long enough, it could dissolve your car!
Our Phos-Kleen B Rust Remover on the other hand is for light surface rust removal prior to painting. It has the additional benefit of preserving the finish for several months prior to painting, so it’s ideal for keeping a metal surface rust free in the damp conditions of a typical garage or workshop.
Please contact us for further information or advice
We hope this has been a useful introduction to the subject of rust removal, but please don’t hesitate to contact us to discuss which techniques might be most suitable for your classic car restoration or other project.
