Applying rustproofing wax in a car restoration or repair project

It’s time for the fourth and final instalment in our four-part series on the corrosion-busting actions you can take when repairing or restoring your vehicle. (To see the other parts in this series, read the articles on rust removalrust conversion and rust proofing with paint.)

After you have gone to the trouble of bringing the vehicle to a solid state free from serious corrosion, you can protect against further corrosion by applying a specialist rustproofing wax to the underbody and cavities.

We’ll work here on the assumption that your vehicle’s underbody has been repainted, or that it has been repaired and repainted in areas that had been suffering from corrosion. Either way, all the metal and paint are sound and clean.

If the underbody does require cleaning however, a thorough wash, ideally with a pressure-wash machine should be done. Use a salt remover and suitable cleaner/degreaser to remove the dirt and contaminants that would otherwise reduce the wax’s ability to work on the surface of the vehicle. The cleaning process is explained in this blog.

If in doubt, remove dirt, salt and grease from the underbody before applying wax rustproofing

Application method: brush, aerosol or spray gun?

Before we get into the application process itself, a word or two about your options for getting the wax onto your vehicle.

Brushing

The first option is to apply the wax with brushes. This will work in most cases (apart from cavities where injection gets the wax where a brush can’t) and you may prefer this if you don’t have access to spray equipment.

Aerosol cans

Aerosols are another option if you don’t have access to an air compressor. The wax products you need are all available in aerosol form. For injecting wax into cavities such as sills and boot lids, make sure that you obtain the necessary aerosol wand (also known as a lance extension).

Compressed air

Using compressed air can make the process quicker and will enable you to penetrate deeper into cavities by better atomisation of the product, so you may need to access or drill our fewer access holes than if use an aerosol (see below). In terms of equipment, you need a compressor that can supply no less than 90psi at 5cfm or higher.

You will also need a suitable wax spray gun, tips and extension wand. As an example, our Undercoating Injection Gun is a great starter kit supplied with the right attachments for underbodies and cavities.

An alternative is our Pro-Wax Injection Kit that is supplied with a 360-degree probe and 90-degree hook spray wand for cavity injection, and a custom-made bullet tip for underbody application.

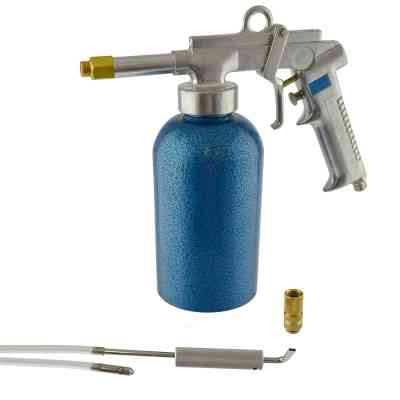
A step-up in quality if you will be using the equipment frequently is the professional-standard Lemmer HD460 rust proofing kit.

You’ll buy the wax either pre-filled in Schutz cans that screw onto your Schutz-compatible spray gun, or in containers that need to be decanted into an empty Schutz can or your gun’s bottle.

Safety first

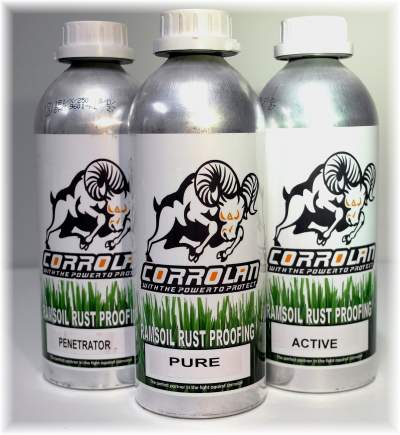
Check the manufacturer’s recommendations for safety equipment. However, even where personal protection equipment is not essential (such as with Rustbuster’s natural lanolin-based Corrolan range), we suggest that you wear goggles, mask, gloves and overalls or a spray suit.

Masking off

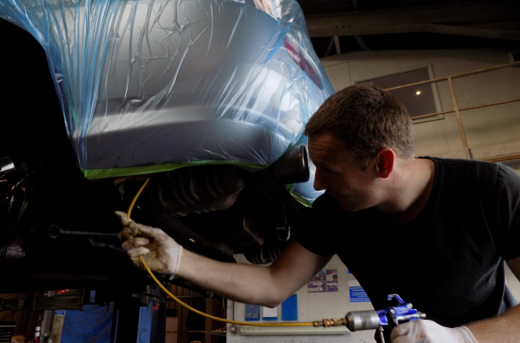
The process starts with protecting the areas you DON’T wish to get the wax treatment. Use a combination of masking tape, plastic or strong paper to cover brake hubs, discs and pads. Ideally, you should also mask off the exhaust system and heat shields so that you aren’t introducing extreme heat to any wax.

We would also recommend masking off at least the first few inches of body paintwork above the line you’ll be waxing to. Masking tape and paper is the classic way to protect against overspray. However, you can use masking wrap instead of paper. This integrates masking tape with a wrap that sticks to the vehicle via static energy to provide excellent protection.


Applying the wax

However you apply the wax, it’s a good idea to immerse the container of wax in warm water to soften it prior to application. (Always check individual product specifications/instructions for the suitable temperature.) This will reduce the viscosity of the wax, so that you can apply it without having to add a thinner. Alternatively, use the wax manufacturer’s recommended thinner to achieve the required viscosity.

The application process can be broken down into three main categories:

  1. Penetrating

To begin a complete wax protection treatment, ideally you should start by coating the suspension components, seams and joints between body panels, and other areas with complex surfaces or small voids. The idea is to get wax into all these tiny pockets where water will inevitably follow. Spray the penetrating wax across these areas and then work it in with a dry paintbrush. After 15 minutes, wipe away any excess wax that is laying wet on the surface with a lint free cloth.

Use a specialist penetrating wax with a thinner consistency than usual. This will enable it to penetrate the smallest crevices. A wax of this type can also be used as a base coat in cavities.

Suitable products: Corrolan Penetrator is the thinnest of the three products in the Corrolan range and is ideal for this stage of the process. When using the Corrolan system it also works very well as a kind of undercoat across all the underbody prior to application of Corrolan Pure.

  1. Cavity injection

Now it’s time to get a specialist cavity wax into your vehicle’s cavities: sills, box sections, chassis rails, doors, bonnet, boot lid, between inner and outer wings, and so on. Cavity wax has a viscosity that allows it to get into every part of the cavity, and then remain slightly soft so that it continues to move and coat the surface as the vehicle flexes.

Use a wand with a dual action that delivers the wax straight ahead and in a 360-degree spray pattern for complete application within the cavity. Insert the lance into the cavity through existing holes where possible, removing and refitting any bungs or grommets.

If you cannot gain access to a section you wish to protect, you can drill a small hole and close it with an aftermarket plug. Rustbuster sell an injection accessory kit that includes a 10mm HSS drill bit and 20 plugs. Before fitting the plug, rub a little wax around the edge of the hole to protect the bare metal.

Insert the lance as far as it will go into the cavity, start spraying, and remove the lance while continuing to spray. You can remove the lance at a steady pace but not too slow, resisting the temptation to absolutely flood the cavity with wax.

Suitable products: Rustbuster’s Corrolan Active and Dinitrol ML are both excellent self-sealing cavity waxes.

  1. Underbody coating

Wax can now be applied across all the underbody. As with other stages, warming the wax will reduce the viscosity and allow easier application.

Coat the floorplans, chassis sections and wheel arches (with arch plastic removed) with wax. Apply a second coat if advised by the manufacturer, after the specified between-coat drying time.

Multiple thinner applications will ultimately provide a better finish than a single thick finish. Also, you need to be careful to avoid coating one area too thickly as this can cause runs and sags in the finish. If you wish to check the wax thickness using a suitable measuring gauge, look for a total thickness of around 600 microns.

Suitable products: Corrolan Pure is ideal for this stage of the process. It maintains a translucent appearance and a slightly soft consistency rather than drying solid, making it easy to inspect and maintain your vehicle. Alternatively, Techshield Underbody Sealing Wax is a bituminous wax that dries harder and solid black.

Finishing up

Even the most diligent restorer will probably miss a few areas. It is therefore a good idea to go over the vehicle with an inspection light to check for areas where a touch-up is needed.

Next, remove the masking tape, plastic, paper and wrap. Wipe off any wax that has found its way to unwanted areas such as brake components, exhausts and heat shields. Use a rag and a small amount of the manufacturer’s recommended cleaner (such as Corrolan Turbo) or white spirit.

Please contact us for further information or advice

We hope this article will help you finish your restoration task with the application of rustproofing wax. Please get in touch with any questions and we’ll be delighted to help.

Share this post

Recent Posts