
Rustbuster’s car rust proofing service – step by step
Among the latest vehicles to undergo our Rustbuster Hot Fog Full Corrolan Rust Proofing Service was a car owned by one of our team. You may have seen Richard on the Rustbuster stand at various classic car shows, including at the NEC. So, it was a pleasure to give his Hyundai Coupe our car rust proofing treatment recently. Over to Richard…
When I bought my 2006 Hyundai Coupe SE as a second car this summer, I was delighted with it. Bought for around a grand with a good service history and 80k on the clock I think I got a good deal. Sure, it’s not the fastest 2.0 litre coupe around, but I love its looks and the way it drives.
Mechanically it’s all great and the bodywork and interior are in good shape. But there are signs of surface corrosion underneath that you’d expect on a 13-year-old car. To stop the rust in its tracks I decided to invest in Rustbuster’s rust proofing service.
I was able to hang out with the team for a day, watch the whole process and take some pictures. I hope my step-by-step description below will be useful to anyone considering protecting their vehicle with this service.
- Remove salt and traffic film
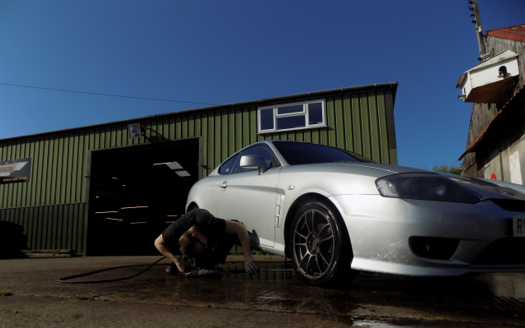
The Coupe was reversed onto ramps to gain access to the underside for the first stage of the process. This began with a thorough wash with a pressure-wash machine, adding Chlor-X Salt Remover and a Traffic Film Remover to the water in suitable ratios. These were left to do their job for a few minutes before a final rinse.
When you think of all the salt, dirt, fuel and oils that are kicked up over miles of motoring, it’s no wonder that this needs to be done. What’s left is a clean, salt-free and grease-free surface suitable for application of the wax.
- Removing underbody plastics
Next, it’s time to get the car in the air on a workshop lift and remove any underbody plastics. In the Coupe this meant removing six wheel arch liner pieces (two on the front and four on the rear).
The Rustbuster team have done this a thousand times so know which tools and techniques to use. Even so, it can be time consuming, with several corroded screws and broken plastic clips to deal with.
- Corrosion inspection
With the plastics removed and the car in the air, further cleaning could be done. This meant getting into all the areas that the plastics had hidden during the pressure wash. Mud, leaves, twigs, cobwebs and a few spiders were removed by hand and wire brushes of various sizes.
The clean and plastic-free underbody could now be assessed. This assessment is an important part of the rust proofing service. Thankfully, it was good news. Rob found just a couple of issues; rust around some of the bolts onto which a wheel liner was fixed, and some corrosion of a rear bumper bracket.
Rob judged that these didn’t require urgent repair, and that wax could be applied later in the process to slow down the corrosion. He made a note of the areas on the job sheet: if I hadn’t been present, these would have been mentioned to me on collection of the car.
If areas requiring urgent attention had been identified, Rob would have marked them with white paint and wax wouldn’t have been applied to the areas. This would keep the area free and ready for work by the customer or their chosen supplier, perhaps involving applying rust converter or cutting out of weakened metal, welding, and painting with rust proofing paint such as Rustbuster’s epoxy mastic. Again, the customer would be alerted to the problems.

- Removing surface corrosion
Next, Rob used an MBX Metal Blaster to remove surface rust from across the underside of the car, including the floor pan, suspension and steering components.
The great thing about this type of bristle blaster is that the bristles are fixed to a flexible belt and it won’t grind away solid surface material. It only removes dirt, rust, paint and any wax that has been previously applied.
Rob was very thorough, taking his time to work around as much of the floor and components as possible. He then ran an industrial dryer over the underbody to blow away even more loose material.

Finally, Rob used a conventional mechanical wire brush to target any small areas that he felt still needed attention.
The result of all this effort is a sound, stable surface for the wax to adhere to. It would have taken me many hours on my garage floor to do this, lying on my back and working hard to achieve such a sound surface.
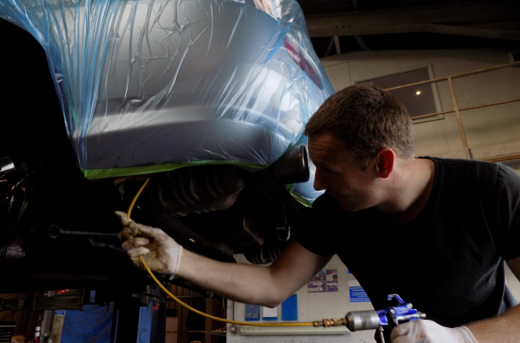
- Masking off the body
A huge roll of plastic sheeting was then wrapped around the car from the sills and wheel arch edges up. This would prevent any wax making its way unnecessarily onto the paintwork. The wax is harmless to paintwork and can be cleaned off relatively easily, but it makes sense to remove the need to do this in the first place. Plastic was also wrapped around the hubs, discs and pads.

- Time for the wax!
After all this preparation the rust proofing could begin: we were now ready for the wax itself. Rustbuster offer a few different types of wax, including Dinitrol, but I had opted for the Corrolan products.
Corrolan is a natural product, which I like from an environmental point of view. It’s also translucent rather than black, so it will allow me to easily keep an eye on the condition of the Coupe.
First, Rob sprayed Corrolan Penetrator around suspension components, seams, joints and other places where penetrating into small spaces is essential. Penetrator is the thinnest of the Corrolan waxes and has been developed specifically for this purpose. He then worked the wax in with a dry paintbrush to ensure maximum penetration.
Next, Corrolan Active was injected into the car’s sills, behind the wheel arches, and inside the bonnet, doors and other cavities. Luckily the Coupe has several bungs and grommets that can be removed to allow access for the metre-long detailing wand. This is fitted with a tip that delivers the wax straight ahead and in a 360-degree spray pattern for complete application within the cavity.
The trick here is to apply just the right amount of wax. The cavities don’t need to be flooded with wax. In fact, a relatively thin layer is recommended.
Completing the wax treatment is Corrolan Pure. The thickest of the three waxes, this is sprayed everywhere else, coating across the exposed underbody including the floorpans and wheel arches.
Rob took his time, spraying fairly slowly to ensure an even coating. It takes about five litres to properly coat the underbody. Rob immersed the container in hot water prior to application to reduce the viscosity and allow it to be sprayed without thinning.

- Quality check
Once Rob was satisfied that he had completed the Corrolan application, he called over his colleague Clayton to carry out a quality inspection. Clayton went over every inch of the underbody with an inspection lamp, pointing out a couple of small areas where he felt additional wax could be applied to ensure correct coverage. As well as being in the customer’s interest, this quality check is necessary as part of Rustbuster’s ISO 9001 quality accreditation.
- Refitting plastics
Rob cleaned up the wheel arch liners and refitted them, using a few new screws where the existing ones were no longer serviceable.
- Wash
A nice finishing touch was that Rob gave the Coupe an external wash. I wasn’t expecting this, but I guess it makes sense after the vehicle had spent time in a workshop environment. Naturally some dust and dirt can be in the air, and there is always the potential for small quantities of wax to find their way onto the car where it shouldn’t be.

- Handover and maintenance
Rob handed the car back to me, showing me a declaration sheet confirming that the work had been carried out. At this point, the customer can also make an appointment for their first annual inspection in a year’s time.
A rustproofing maintenance kit was also supplied to me, with Corrolan Active and Pure in aerosol form. This means that if I ever have any work done that requires wax to be removed, it can be touched up again afterwards.
For just an extra £5 plus VAT a customer can have pictures taken during the process and supplied on a memory stick. The pictures, along with the declaration sheet, is handy evidence that work has been done and could add value to the car.
Driving away the car I noticed quite a pleasant smell of the Corrolan and had confidence that the car will be corrosion-free when the next MOT is due in nine months, and very likely well beyond that.
Thanks to Richard for taking the time to explain the process. Here at Rustbuster we help owners of just about every type of vehicle to get protection from corrosion. From vintage treasures to modern classics and brand new cars, we’ve done them all. Please check out our vehicle rustproofing service page or contact us for more information


