
-
OUR RUST TREATMENTS – AWARD-WINNING PRODUCTS
-
DEGREASING AND SALT REMOVAL
-
RUST AND ROT, HOW FAR SHOULD YOU GO?
-
PAINTING TREATED STEEL
-
TREATING RUST-FREE STEEL
-
PAINTING OVER RUST AND CONVERTERS
-
STRIPE COATING
-
SEAM SEALERS AND ADHESIVES
-
RUST PREVENTION ON VEHICLE BODYWORK
-
RUST-PREVENTING WAXES AND OILS
Ian Allen, the proprietor of Rustbuster Ltd, possesses extensive expertise in rust treatment and effective methods for treating rust on automobiles. Renowned for his proficiency, he is frequently sought after for consultation and is frequently cited in various classic car magazines. Ian has also played a significant role in numerous project staff cars featured in these publications. Below is an article from Classics Monthly detailing his exceptional rust treatment on a Morris 1800 project staff car.
Ian was provided with products from all of the major manufacturers, and he shows how to perform rust treatment using rust converters, underbody, and cavity waxes. It’s worth a look just to see him getting his hands dirty.
Also see this article by Rob Marshall of Car Mechanics magazine
Our Rust Treatments – Award Winning Products
Rustbuster Ltd. has established a remarkable reputation in the automotive restoration and maintenance industry, consistently earning prestigious awards for its rust treatment products over the past two decades. In the highly competitive March 2013 Classics Monthly 3-year test, where various well-known companies such as Bilt Hamber, POR-15, Eastwood Rust Encapsulator, Caprotech, and Rust Seal participated, Rustbuster’s Epoxy Mastic 121 emerged as the undisputed winner. This achievement was the outcome of a rigorous real-time test, involving the samples being showcased at major shows and witnessed by hundreds of thousands of enthusiasts. We take immense pride in this award and believe it highlights the exceptional quality of our products, making them worthy of your careful consideration.
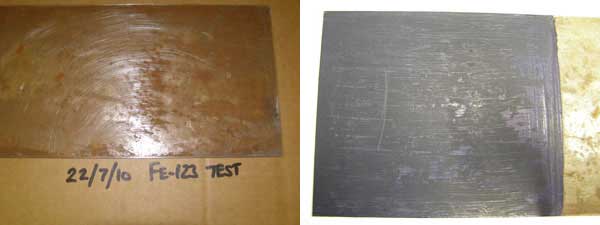
Rustbuster has a history of winning best-in-test accolades, including previous victories with Practical Classics and MG Enthusiast magazines, specifically for the Rustbuster Epoxy Mastic 121 product. Another notable achievement was our Rustbuster FE-123 rust converter primer winning the 2011 Practical Classics real-time rust converter test, conducted on a daily driven Ford Sierra. In this test, the roof served as the test panel for various leading rust converter primers. You can find the full report on our FE-123 page on our website. Additionally, Classics Monthly also recognized our FE-123 as the best-in-test in 2012.
We invite you to explore our case history page, where you will discover diverse industrial applications for our products in areas such as rail transport, marine environments, and extreme conditions. In 2016, we successfully introduced our Corrolan range of sustainable rust-proofing products to the Norwegian market. The tremendous success of Corrolan in Norway, known for its harsh conditions and rigorous testing, speaks volumes about its effectiveness. To learn more about using Corrolan, you can find detailed information towards the end of this discussion or simply click on the highlighted orange links to access specific product pages.
At Rustbuster, we are unafraid to introduce innovative products to the market when we believe they surpass our existing offerings. This philosophy has been instrumental in the growth of our Rustbuster, Techshield, and Corrolan brands. For a quick guide, you can find the reasons behind our product selections at the bottom of the page. We encourage you to browse through this section to gain a deeper understanding of our rustproofing and rust treatment philosophy, and why we wholeheartedly recommend our products to you. If you’re eager to learn how to treat rust in cars, continue reading to expand your knowledge on the subject.
PREPARATION – PREPARATION – PREPARATION!
DEGREASING AND SALT REMOVAL
To begin the rust treatment process, it is crucial to eliminate any rust, flaking paint, grease, and salt from the vehicle’s surface. It is widely understood that loose rust, dirt, or paint can create an unstable foundation beneath the new paint layer, causing it to deteriorate over time. However, it is equally important to address the presence of grease and salt. Failure to thoroughly remove grease and salt prior to treatment would render the entire process futile.
Rustbuster has developed an innovative salt remover called CHLOR-X, which can be conveniently applied using a pressure washer or a hose end applicator. This specialized solution ensures that no residual rust crystals remain on the steel surface. When blast cleaning, it is crucial not to neglect the removal of grease and salt. Otherwise, these contaminants will penetrate deep into the steel’s pores, compromising the adhesion of the subsequent paint coating and potentially creating an ideal environment for rust formation. Similarly, wire brushing or flap wheel cleaning without prior washing and degreasing can have the same adverse effects.
You may wonder if grease is present on the components, and what about salt? Given that we reside on an island, surrounded by a humid atmosphere and the substantial amount of rock salt used on roads during winter, it is imperative to consider the likelihood of contamination. Even if the steel appears clean, it is essential to wash it thoroughly with fresh water and a suitable detergent solution like Rustbuster SP10 or Rustbuster Safer Degreaser (for those preferring non-caustic options). It is important to avoid using white spirit, turps, diesel, or paraffin for degreasing before painting, as they only remove surface grease, leaving behind an oily and diluted residue within the steel’s pores, which can lead to system failure. Instead, opt for a degreaser that emulsifies the grease, causing it to foam and break down. Rustbuster SP10, for instance, is a concentrated caustic detergent that effectively dissolves grease, leaving the surface impeccably clean and ready for further surface treatment.
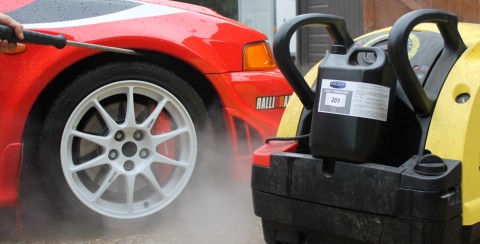
Steam cleaning using Rustbuster Chlor-X 100 salt remover additive at 100:1
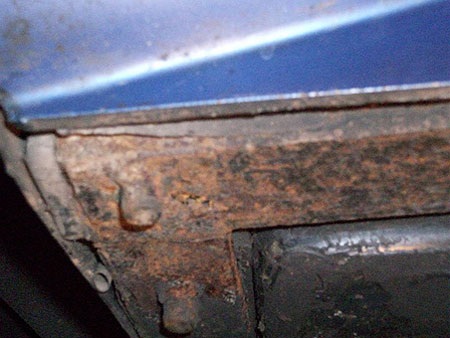
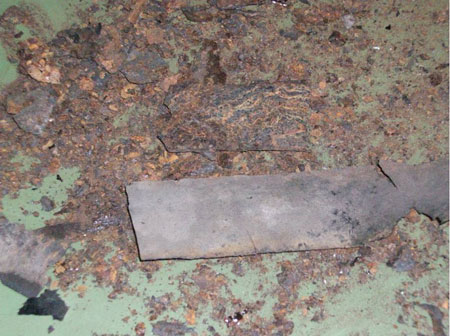
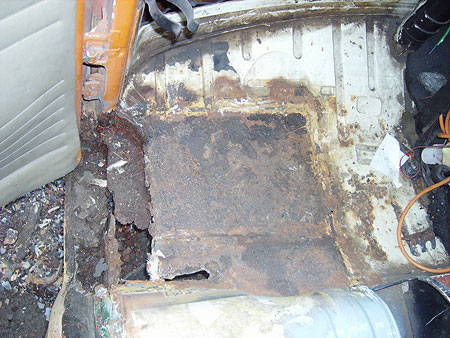
Sometimes it’s hard to know exactly how much there is until you disturb it, Can this be treated?
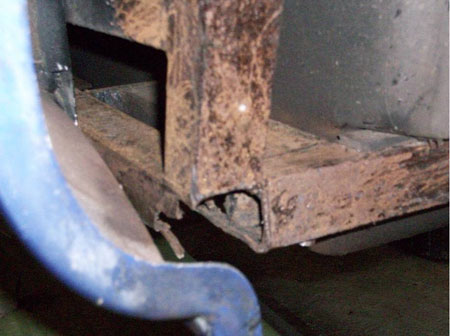
By the time you have poked and hammered the rusty metal the extent of rot will be revealed
I’m not a fan of powder coating a car chassis
I’m not a huge fan of powder-coating a car chassis, and it’s worth noting that different preferences and approaches exist within the realm of rust treatment. While textbooks may suggest blast cleaning to SA 2.5, this method may not always be practical or suitable, especially when dealing with confined spaces or automobiles where thin steel can be susceptible to warping. Many of us face these challenges when addressing rust-related issues.
One common question I receive is why Rustbuster offers a wide range of products instead of a single, do-it-all solution. I acknowledge that it may seem confusing, but the reason behind the diverse product offerings is similar to the anecdote about a lost man in Ireland who asked for directions to a specific address. The response he received was, “Well, I wouldn’t start from here if I were you.” Perhaps you’ve experienced a similar feeling when seeking advice from friends or online forums, where multiple opinions are offered, each valid in their own context. Rustbuster provides products tailored to different situations, ranging from complete bare shell restorations to running repairs. The approach taken will vary depending on whether you’re starting from scratch or working with a rolling restoration. Therefore, there isn’t a one-size-fits-all solution, but there is undoubtedly a suitable product that will work effectively in your specific situation.
Let’s delve into the two types of rust treatment that can be successfully employed, regardless of your starting point:
- Complete rust removal back to bare steel: We will first address the preparation process required to achieve a clean, bare steel surface.
- Conversion of surface rust: Next, we will discuss how to handle rusty steel and the utilization of rust converters.
By understanding these two approaches, you’ll be better equipped to select the appropriate treatment method for your particular rust situation.
RUST AND ROT, HOW FAR SHOULD YOU GO?
When dealing with rust, it’s important to understand the different degrees of rust that you may encounter. In simplified terms, these can be categorized as surface rust, loose scale, pitted rust, and rot. The extent to which you treat these types of rust depends on your personal judgment. Some individuals strive to remove every trace of rust, creating exquisite reproductions of vehicles that are truly impressive. However, it’s often the case that when they attempt to recoup their investment by selling their masterpiece, they discover that it was purely a labour of love, as the financial returns may not match their efforts. This is why caution is advised when purchasing a classic car from a dealer, as there is a limit to how much they can invest in restoration before selling it.
For the rest of us, our primary goal is to learn the most effective methods of treating rust and preventing its recurrence. Sometimes, even complete rust removal through methods like dipping is insufficient if the stripped metal is not properly primed with a suitable non-porous primer. Through experience, I can confidently say that the products and recommended practices we endorse at Rustbuster will assist you in preventing future outbreaks of rust.
However, it’s important to note that when it comes to rot, treatment is not possible. In such cases, the only solution is to cut out the affected section and weld in a new one. To determine if what appears to be rot is indeed rot, it’s necessary to inspect it closely by tapping, poking, and scraping. If the affected area feels brittle and lacks the reassuring sound of a “ting” when struck, further investigation is required. It can be disheartening when a seemingly large rust spot turns out to be a gaping hole, but it is the only way to address the issue. The accompanying pictures depict a Marcos car I purchased. It appeared and felt solid, but once it was lifted on a ramp, the jacking point on the outrigger disintegrated. These images illustrate the story, highlighting what was hidden beneath a seemingly flawless powder-coated exterior.
PAINTING TREATED STEEL
When it comes to protecting vehicle underbodies, suspension components, and floor pans, Rustbuster Epoxy-Mastic 121 is recommended as an effective coating. This product forms a completely impervious, flexible, and hard barrier on the steel, preventing future rust. It can be used as a standalone coating or as a base for additional coatings such as wax sound deadeners, stone chip coatings, primers, and topcoats.
For car bodywork, the process involves preparing the surface back to clean steel, treating it with Rustbuster Phos-Kleen B, and applying a coat of Rustbuster Custom Epoxy 421 before proceeding with body filler primers and topcoats.
Epoxy-Mastic 121 stands out as an excellent barrier for the structural parts of a vehicle. Its small molecules allow for deep penetration into the surface of the steel before cross-linking, thanks to the low surface tension. This penetration and adhesion to every pore and crevice on the steel’s surface create a primary bond, ensuring strong attachment at every square millimetre coated.
In contrast, single-pack coatings and powder coatings are often considered secondary bonds. While they may initially adhere well, once a breach occurs in the coating, they can easily come apart, leading to rust underneath. Rustbuster Epoxy-Mastic 121, with its slow-cure epoxy formulation, forms a tough and flexible barrier that is completely bonded to the steel, preventing rust from spreading under the coating even if a sharp stone causes damage. The primary bond of Epoxy-Mastic prevents delamination and restricts corrosion to the affected area. If a rust spot appears during the inspection, it can be treated and repaired by applying a touch-up of Epoxy-Mastic.
Overall, Rustbuster Epoxy-Mastic 121 provides a highly effective solution for rust prevention, offering superior adhesion, durability, and protection against corrosion.
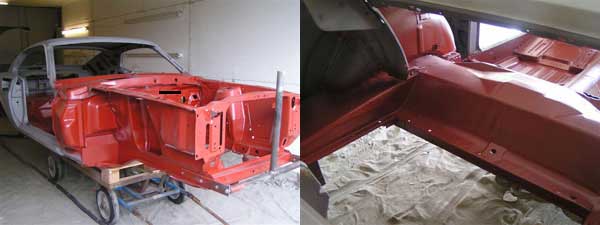
Mustang structure coated in red Epoxy Mastic 121, including the chassis and floor pan.
TREATING RUST FREE STEEL
After degreasing and washing the surface, you can effectively remove surface rust using an MBX Metal Blaster power brush. This tool offers nearly the same level of cleanliness and white steel surface profile as blast cleaning, without compromising good metal or introducing heat or acid. While MBX power brushes can be expensive, they are highly recommended for car restorers. You can find more information about them on the MBX page in the surface preparation section of our website, where you can also watch an impressive video showcasing the tool’s capabilities.
Alternatively, power tool sanding or flap wheel abrasive can be used, but they may leave the steel with a grey colour and some pitting. In industrial protective coating terms, this is referred to as SA 3. By achieving this level of surface preparation, you have reached an internationally recognized standard to work from. To maintain and further enhance the surface before painting, you can wipe it with Rustbuster Phos-Kleen B solution. This solution passivates the surface of the steel, converting any iron oxide within its pores into iron phosphate. The surface will turn blue/black to indicate that it’s ready for painting. Just before applying the paint, wipe the treated surface with Chlor-X to remove any phosphate salts. Then, use an 80-grit abrasive to DA sand or hand sand the surface, ensuring that the steel has the appropriate surface profile to adhere to the primer. Additionally, this process passivates the pits and micropores within the steel. It has been proven that phosphating the steel in this manner improves the performance of the finished coating in ASTM salt tests.
When sanding the steel, avoid polishing it with a soft wire wheel cup brush, as this will leave the surface polished and unsuitable for primer adhesion.
When sanding the steel, avoid polishing it with a soft wire wheel cup brush, as this will leave the surface polished and unsuitable for primer adhesion.
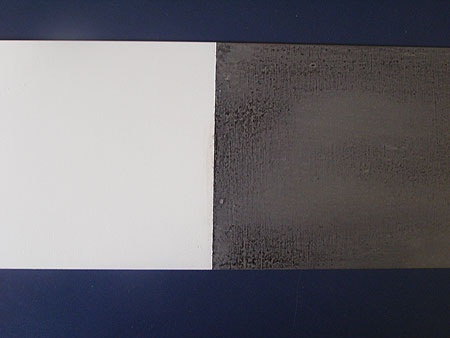
Phos-Kleen treated steel on the right, primer on the left
I completely understand the scepticism surrounding claims about rust protection and the duration of salt tests. When discussing the performance of our products, I often mention that they have passed a 1000-hour salt test without failure. However, it’s important to clarify that the salt test is conducted in a controlled environment, which represents an accelerated period of exposure to an aggressive atmosphere. While this test provides valuable information, it doesn’t necessarily guarantee years of protection in real-world conditions.
In response to a car show attendee who expressed their desire for long-lasting protection, I explained that comparable salt tests can be more informative. These tests involve using metal coupons, which are pieces of metal from the same batch with the same size and thickness. The coupons are coated according to the manufacturer’s specifications, often by the manufacturer themselves, and then submitted to a laboratory for testing. When all the products are tested on the same day, under the same conditions, it allows for a more objective comparison of their performance.
In the past, Rustbuster submitted our products to a well-known magazine for a comparison test, and our product came in second place. It had the best corrosion resistance among all the products tested but was marked down on price, which was a perplexing outcome. In the following month’s magazine, there was an editorial statement mentioning that if our product had been included in the test, another product that wasn’t tested would have been the best. The manufacturer of that particular product continues to claim that their product won the test. However, since their product wasn’t tested alongside the others in a real-time batch of coupons, their claims are unfounded, regardless of any data they present.
At Rustbuster, we develop our products in-house but also send them for testing and evaluation by government-approved facilities. While a declaration of passing a salt spray test indicates that the product can withstand an aggressive environment, it’s important to recognize the limitations of such tests and consider real-world conditions when evaluating rust protection performance.
PAINTING OVER RUST AND CONVERTERS
To be able to paint surface rust there are a few precautions that need to be taken. After thorough degreasing all loose rust dirt and loose paint coatings still need to be removed, usually by Shave hook scraper or a stiff four row steel brush by hand. The awkward profiles of steel under a vehicle means that often preparation by hand tools is the preferred method. This will leave a fine layer of ginger rust that lies directly on the steels surface in fact it is the steels surface. This surface layer of iron oxide can be treated with a rust converter primer such as Rustbuster Fe-123 molecular rust converter. This converter actually uses natural substances bound in a latex film to physically change the nature of the steels surface from iron oxide to iron tannate. This can then be painted with Rustbuster Epoxy-Mastic 121. Or an under body wax.
When dealing with surface rust, it is important to follow specific precautions before applying paint. After thorough degreasing, any loose rust, dirt, and paint coatings should be removed. This can be done using tools such as a shave hook scraper or a stiff four-row steel brush by hand. Given the often-complex profiles of steel under a vehicle, manual preparation with hand tools is often preferred.
After the preparation process, a thin layer of surface rust, often referred to as ginger rust, may remain directly on the steel surface. This layer can be treated with a rust converter primer, such as Rustbuster Fe-123 molecular rust converter. This converter contains natural substances that are bound in a latex film and work to chemically transform the nature of the iron oxide surface into iron tannate.
Once the rust converter primer has been applied and allowed to dry, the surface can be painted with Rustbuster Epoxy-Mastic 121, which provides a durable and protective barrier. Alternatively, an underbody wax can be used for added protection.
By following these steps, the surface rust is effectively treated and coated, helping to prevent further rust development and ensuring a suitable surface for painting or the application of protective coatings.
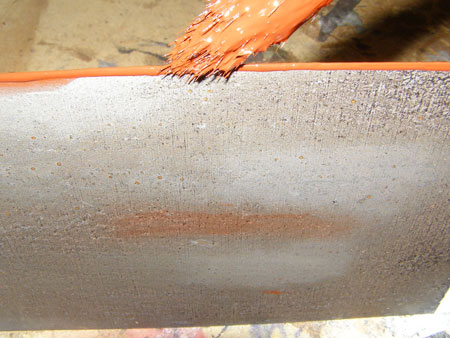
All loose rust removed Fe-123 Converter applied
While there may be purists who advocate for total rust removal, it is important to acknowledge that many customers prefer to treat rust in a different manner. To properly address surface rust, it is crucial to understand that the steel’s actual surface is composed of iron oxide, not the loose rust layers on top of it. Any loose rust left on the surface can compromise the adhesion of the paint coating, so it is necessary to remove all loose rust and expose the steel’s iron oxide surface before applying a rust converter.
In cases where crevices and seams are involved, it becomes challenging to remove all traces of rust without disassembling the entire assembly. However, it is vital to treat these areas correctly. The seam should be thoroughly cleaned, removing any dirt or old rust as much as possible. Rust forming within an oxygen-starved seam or crevice can lead to rapid corrosion, with a corrosion rate 400 times faster than surface corrosion. Injecting Rustbuster Fe-123 into the seam ensures complete saturation of the rust within. Fe-123 is damp-compatible, allowing it to react with any hidden dampness and travel through to the steel. After the seam has dried, applying a seam sealer deep into the seam using a fine nozzle on the cartridge is necessary. This can be followed by over-painting with Epoxy-Mastic 121 to create an airtight barrier.
For hidden seams, Fe-123 can be applied via an injection gun, followed by cavity wax to provide protection. The key to successfully painting surface rust-converted steel lies in applying a barrier coat to the converted iron oxide surface (iron tannate). By preventing air and moisture from reaching the steel’s surface, further rusting is inhibited. Epoxy-Mastic 121 is highly effective in this regard. Its small molecules can penetrate deeply into the steel’s surface before cross-linking during the drying process. This penetration is facilitated by the low surface tension of the fine molecules. Once dry, the coating forms an exceptionally strong and flexible barrier, firmly attaching itself to every pore, nook, and cranny on the steel’s surface.
By following these steps and using Epoxy-Mastic 121, a reliable and durable protective coating can be achieved, effectively preventing further rust development on the treated surface.
STRIPE COATING
Stripe coating is indeed a recommended method for coating steel on a vehicle, especially when it comes to preventing rust on edges and sharp profiles. Rust often tends to break out on the return edge of a car’s wheel arch, indicating the vulnerability of such areas. The reason for this is the shrinkage of paint as it dries on an edge. When paint is applied to a flat panel, it flows and forms an even layer. However, when the same layer thickness is applied to an edge, the paint shrinks during the drying process. As a result, the paint on either side of the edge pulls in opposite directions, leading to a thinner paint film at the edge compared to the rest of the panel.
To address this issue, a simple solution is to apply a coat of paint directly to the edge of the steel using a brush. By doing so, the film thickness in this vulnerable area can be increased before applying a spray coating. During the initial primer stage, a good non-porous epoxy primer such as Rustbuster Custom Epoxy 421 for bodywork or Rustbuster Epoxy-Mastic 121 for the vehicle underside and floor pan can be used for stripe coating.
By incorporating stripe coating into the painting process, the film thickness on edges and sharp profiles is enhanced, providing added protection against rust formation in these critical areas.
Loading up the vulnerable edges prior to painting
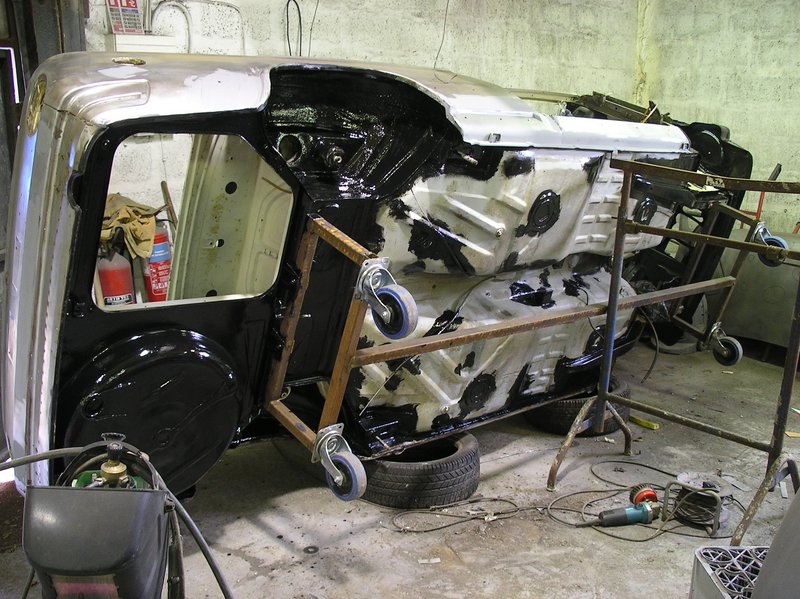
Look at the fantastic job this restorer is doing by loading up all of the vulnerable areas first prior to a second full coat of Epoxy Mastic 121
SEAM SEALERS AND AHESIVES
Seam sealers and construction adhesives are crucial in rust prevention, particularly when it comes to assembling bolt-on body panels. Using a polyurethane construction adhesive like Dinitrol 410 UV during the assembly process can help reduce corrosion by insulating the different types of steel used in body panels, shells, and chassis. It also serves to insulate the nut and bolt connections, which can have different potentials and increase the risk of corrosion.
When bolting aluminium panels to a steel body, it is essential to take extra care and insulate them from each other using a construction adhesive. Aluminium and steel have different potentials, and without insulation, it can lead to accelerated corrosion.
Seam sealers should be applied wherever necessary over the treated and primed surface, providing an additional layer of protection. If required, these sealers can also be painted over. It’s important to note that steels of varying thicknesses have different degrees of rust potential. When bolting a thin piece of steel to a thicker one, the thinner piece is more likely to rust first. By insulating the interface between these steels and their fasteners, you can reduce this type of corrosion.
In summary, the use of construction adhesives and seam sealers, along with proper insulation between different steel types and thicknesses, is vital in preventing rust and maintaining the longevity of the vehicle’s body panels.
RUST PREVENTION ON VEHICLE BODYWORK
The importance of proper preparation and the choice of primer cannot be overstated when it comes to achieving a high-quality finish and preventing future corrosion.
- Controlled Body Shop Conditions: Manufacturers of body shop products assume that the work will be carried out in controlled conditions where temperature and humidity can be managed. However, amateur auto restorers often work in home garages, which can have fluctuating temperature and humidity levels. This can lead to adhesion issues and moisture-related problems if not properly addressed.
- Porous Primers: Primers that are designed to be easily sanded are often porous. While they are user-friendly and suitable for amateurs, the porous nature of these primers can allow moisture to penetrate, leading to corrosion over time. In controlled conditions, this may not be an issue, but in less-controlled environments, it can cause problems.
- Sealing Against Humidity: To combat the effects of humidity, it’s recommended to seal the prepared steel against moisture. This involves preparing the steel surface using DA/Flap wheel sanding to bare metal, followed by chemical preparation with a product like Rustbuster Phos-Kleen B. This is then followed by using a lint-free cloth and abrasive, such as 3M grey Scotchbrite, to clean the surface. Once dry, the surface is de-nibbed with p320 abrasive and wiped with a tack rag before priming with a non-porous epoxy primer like Rustbuster Custom Epoxy 421.
- Benefits of Epoxy Primer: Epoxy primers provide better adhesion and, most importantly, are non-porous. This means that they can be left in their primer state for the duration of the restoration without the risk of moisture penetration. Rustbuster Custom Epoxy 421 can be filled with body fillers and accepts other paint coatings and finish coats. While it may not be as easy to sand as some other primers, its non-porosity is crucial for long-term rust prevention.
- Recommended Body System: The suggested body system includes removing loose paint and rust, treating the steel with Rustbuster Phos-Kleen B, priming with Rustbuster Custom Epoxy 421, filling and preparing defects with metal-loaded fillers, applying another coat of Rustbuster Custom Epoxy 421, and finishing with the desired body paint.
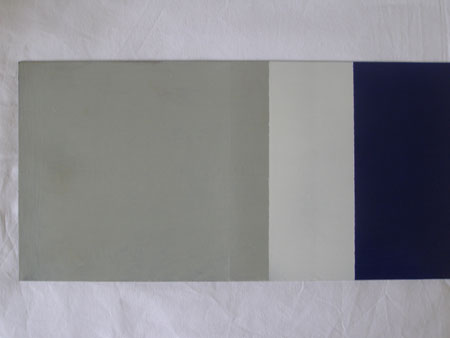
Rustbuster Custom Epoxy 421 grey + Primer light grey followed by base-coat colour
RUST PREVENTING WAXES AND OILS
When considering the use of rust-preventing waxes, it’s essential to ensure proper surface preparation. Assuming you have already prepared a suitable surface, let’s discuss the application of rust proofing wax, especially in cavities that are not visible or accessible for preparation.
One option to consider is using a rust converter before injecting wax into cavities. While there are differing opinions on this matter, I personally prefer using a hygroscopic converter to pacify and seal the rust within cavities. Rustbuster Fe-123 is a suitable product that can be diluted to reduce viscosity and penetrate hidden cavities, even in the presence of moisture. The converter incorporates moisture into its composition and allows it to evaporate away from the surface of the steel, effectively sealing the rust. It’s important to note that adhesion within the cavity is not crucial, so applying a generous amount of the converter is recommended. However, Fe-123 contains heavy zinc phosphate solids, which can be challenging to atomize during cavity injection.
If you prefer not to use a converter inside cavities, an alternative option is Corrolan Penetrator, a moisture-displacing and highly penetrative low surface tension oil-based penetration fluid specifically designed for cavities. This fluid can be used in conjunction with the Corrolan system or any wax-based rust-proofing products available on the market.
For cavity injection, a suitable delivery method is essential. Rustbuster’s Pro-wax injection gun is recommended as it can atomize the product sufficiently for penetration. Once the rust converter has fully cured, cavities can be injected with cavity wax. Rustbuster MIL-SPEC. ASTM cavity wax is an effective solution that can be sprayed directly from the can onto the vehicle underbody. For cavities, it is advisable to thin the cavity wax with 25% white spirit for optimal penetration into tight seams. During the summer months, the wax is usually at a spraying consistency. The goal is to ensure thorough coverage of every part of the cavity. The wax will dry and form a flexible waxy film, providing a barrier against rust. Rustbuster MIL-SPEC. ASTM cavity wax offers excellent penetration and protection, without the need for thinning. It exceeds ASTM salt fog protection requirements and provides effective barrier thickness against rust. It can be applied over Epoxy-Mastic 121 or Fe-123 on the vehicle underside and suspension components. Additionally, Rustbuster Techshield underbody black is available for those looking for a traditional black underbody wax that forms a dry, self-healing film and imparts a black satin colour to the vehicle underside.
For those who prefer a non-petroleum-based product, the Rustbuster Corrolan range is an option. Based on natural lanolin, Corrolan products naturally form a hermetically sealed surface that prevents air and water penetration. By using the Corrolan penetrator primer, moisture within the steel’s pores and seams can be eliminated before applying an injected coat of Corrolan Active cavity wax. All Corrolan products create a self-repairing, flexible, transparent film. Various viscosities are available, catering to different preferences and applications. Corrolan Pure can be used neat as a rust-proofing wire grease in marine environments or thinned with Corrolan Turbo, a low VOC solvent with no added odour. This combination makes the application of Rustbuster Corrolan versatile for various rust-proofing situations. Pairing it with Rustbuster Pro-Wax rust-proofing injection guns ensures comprehensive rust protection.
It’s important to note that achieving 100% coverage is crucial when applying cavity wax. Poorly injected cavities may experience more rusting compared to untreated ones. Inadequate atomization of the wax, uncoated spots (holidays), and the insufficient film thickness can contribute to this issue.
If you have found this discussion useful in your fight against rust then I am glad to help. If you have any questions drop me a line and I will answer you personally. Ian Allen